How to Make Yoghurt in a BenchFoods Dehydrator at Home
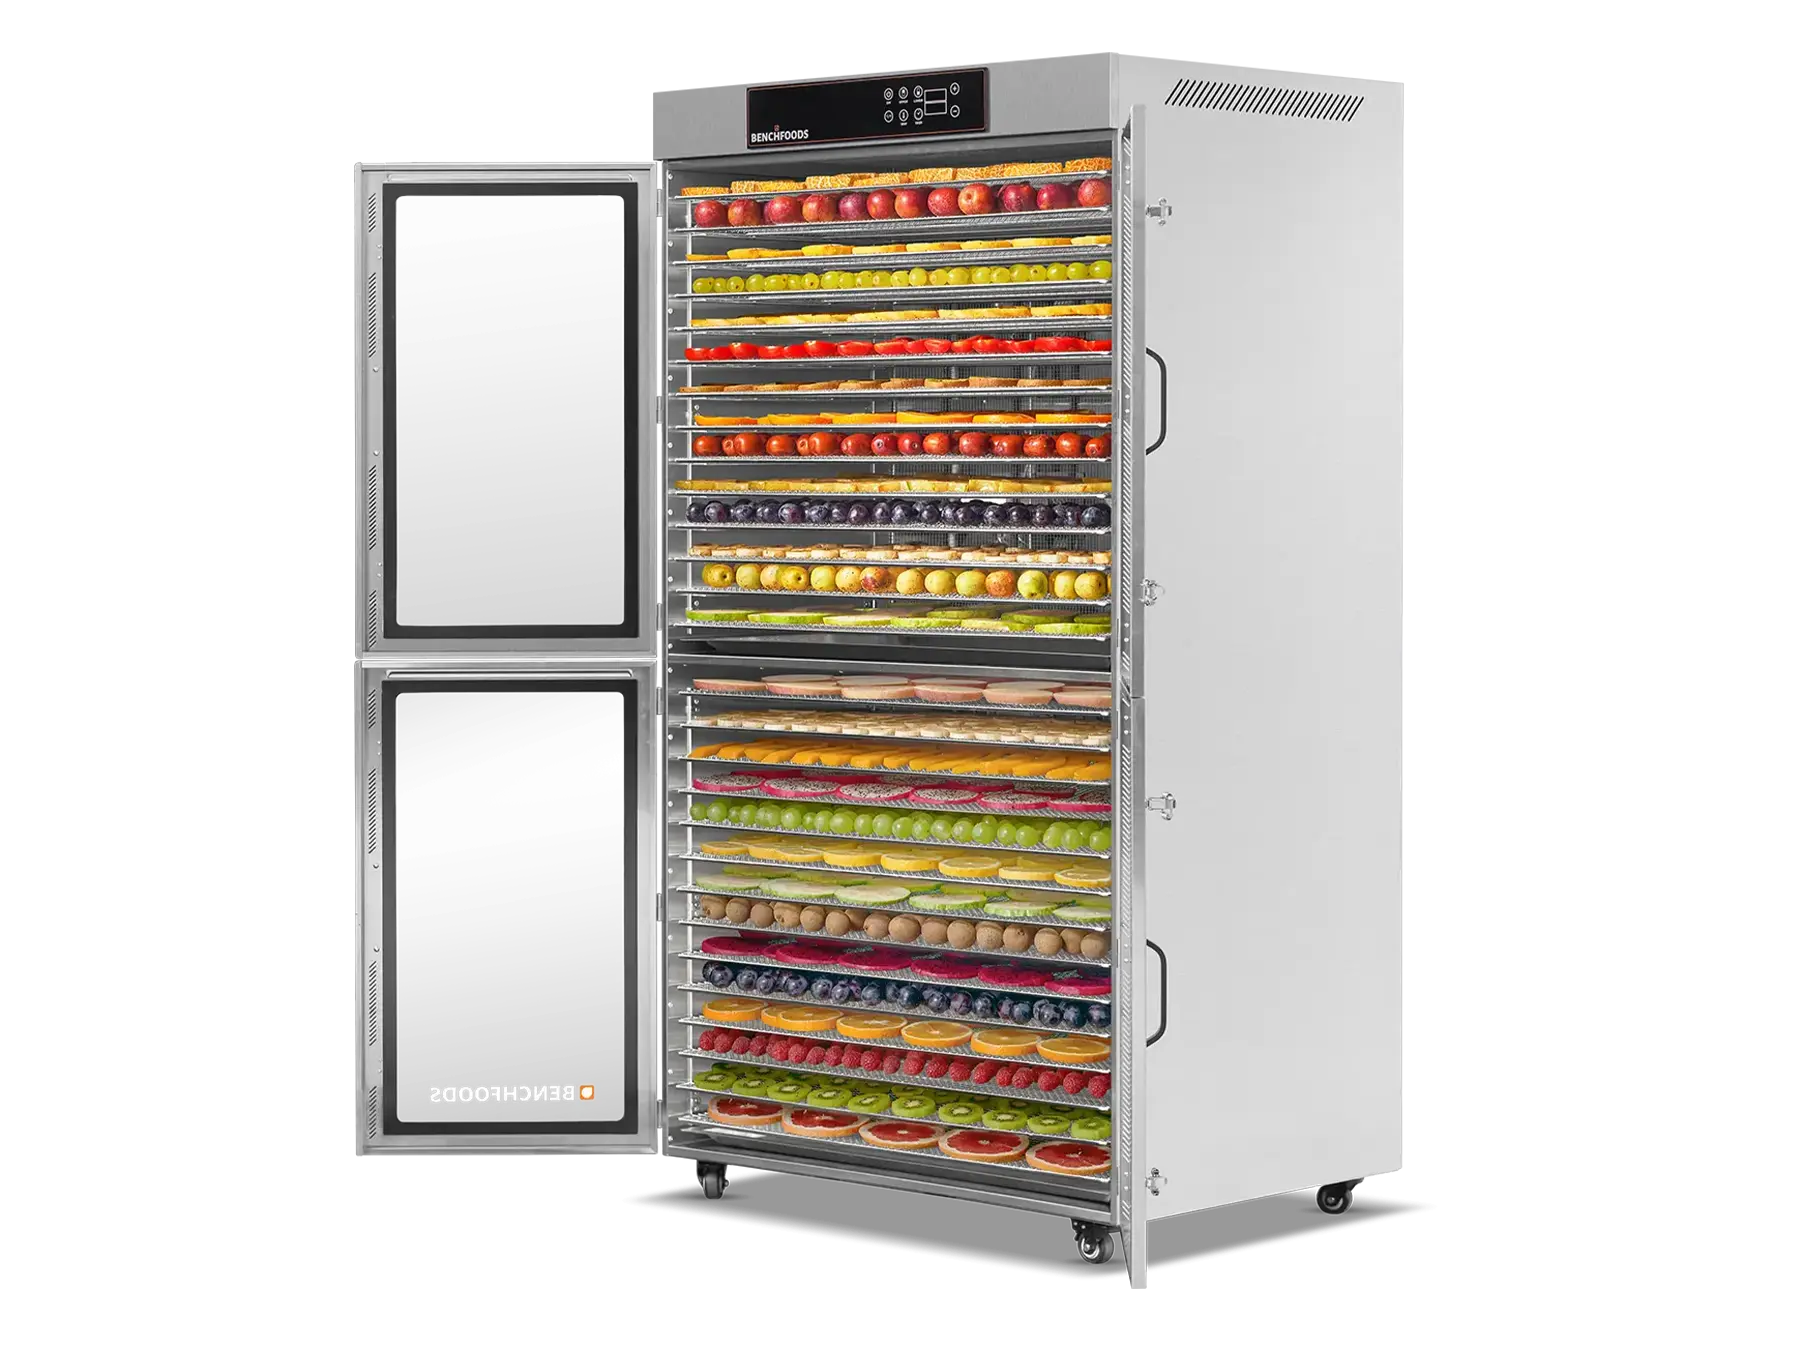
Making homemade yoghurt in a dehydrator is one of the easiest ways to turn everyday milk into a thick, creamy, probiotic-rich snack. Instead of buying tubs of yoghurt every week, you can use yourBenchfoods 10 tray dehydratoras a gentle yoghurt incubator and make big batches in one go, and the health benifits are unmatched!
Research has shown that yoghurt isn’t just a convenient snack – it’s also nutrient-dense and linked with several health benefits, including better bone health, gut health, and potential support for heart and metabolic health. A 2022 review on the beneficial effects of yoghurts and probiotic fermented milks highlights that yoghurt provides calcium, protein, B vitamins and beneficial bacteria, and may help reduce the risk of conditions like osteoporosis, diabetes and cardiovascular disease.
In this guide, you’ll learn exactly how to make yoghurt in a dehydrator, which temperature to use, how long to incubate, and simple tips for getting consistent results at home.
Why make yoghurt in a dehydrator?
Most yoghurt recipes tell you to use an oven light, a slow cooker, or a special yoghurt maker. However a Benchfoodsfood dehydrator gives you some big advantages:
Precise 1 degree low-temperature control – perfect for keeping yoghurt at an exact stable incubation temperature.
Even airflow across trays – helps every jar set evenly, not just the ones in the “sweet spot”.
Large batch capacity – you can fill multiple shelves with jars and make a week’s worth of yoghurt in one run.
If you already own a dehydrator for dried fruit, jerky or herbs, this is an easy way to get even more value from it.
Why homemade yoghurt is better (for busy mums and health-conscious eaters)
Whether you’re juggling school runs and after-school activities, or you’re someone who really cares about what goes into your body, homemade yoghurt is a simple swap that makes a big difference.
Here’s why it works so well for both busy mums and health-focused individuals:
1. Cleaner ingredients you can trust
When you make yoghurt at home, you’re in charge of every ingredient. You choose the milk. You choose the starter. That’s it. No hidden sugars, no gums or thickeners, no artificial flavours or colours, just real food you can actually pronounce. For anyone who reads labels or avoids unnecessary additives, this alone is a huge win.
2. Total control over taste and texture
Homemade yoghurt is customisable:
Want it less sweet for everyday snacks or kids’ lunchboxes? Easy.
Prefer it thick and creamy for desserts or smoothies? Extend the incubation time or strain it.
Need dairy that’s full-fat, low-fat, A2 or lactose-reduced? You decide.
You control the fat level, fermentation time, flavours and toppings. It’s your yoghurt, your way.
3. Batch-friendly for busy schedules
If you’re time-poor, a 10 tray dehydrator is your secret weapon. Set up a big batch at night, let it incubate while you sleep, and wake up to jars of yoghurt ready to chill. One mostly hands-off session gives you:
Breakfasts for the week
Lunchbox fillers
After-school snacks
Easy bases for smoothies and desserts
It quietly does the work in the background so you don’t have to!!
4. Better options for kids and families
For mums, yoghurt is often a go-to snack – but supermarket tubs can be loaded with sugar and additives. With homemade yoghurt, you can:
Stir through real fruit, honey or maple syrup instead of refined sugar
Add granola, seeds or dehydrated fruit for crunch and variety
Serve it plain for toddlers or lightly sweetened for older kids
You know exactly what your kids are eating, and you can adjust flavours to suit even the fussiest little taste buds.
5. Budget-friendly and less waste
Yoghurt can be surprisingly expensive, especially for families or people who eat it daily. Turning simple milk into yoghurt at home:
Saves money over time
Lets you buy milk in bulk
Reduces plastic packaging waste from single-serve tubs
For anyone trying to eat well on a budget and be a bit kinder to the planet, homemade yoghurt is a smart move.
What you need to make yoghurt in a dehydrator
To make homemade yoghurt in a dehydrator, you only need a few basics:
Ingredients
- 1–4 quarts of whole milk (for the creamiest yogurt)
- 3–6 tablespoons of plain yogurt with live and active cultures (your “starter”)
Clean glass jars or food-safe containers with lids
A saucepan
A whisk or spoon
(Optional) A kitchen thermometer
Step 1: Heat the milk
Heating the milk helps your yoghurt set thicker and more reliably.
Pour the milk into a saucepan.
Gently heat over medium heat until it reaches about 176–185°C.
If you don’t have a thermometer, look for steam rising and small bubbles around the edge, but do not boil.
Once it reaches temperature, turn off the heat.
This step changes the milk proteins and gives you a smoother, creamier yoghurt.
Step 2: Cool the milk to incubation temperature
Next, let the milk cool down to the temperature that yoghurt cultures love.
Aim for around 104-113°F
Without a thermometer, think “warm bath water” – warm to the touch but not hot enough to burn.
Let the milk sit until it reaches this warm stage. Stir occasionally to help it cool evenly.
Step 3: Add the yoghurt starter
Now you’ll turn warm milk into yoghurt-in-the-making.
In a small bowl, add 2–3 tablespoons of plain yogurt with live and active cultures.Use about 2–3 tablespoons of starter per 1 quart of milk.
Spoon in a little of the warm milk and whisk until smooth.
Pour this mixture back into the pot of warm milk.
Stir gently to combine, without whipping in too much air.
You’ve just inoculated the milk with live yoghurt cultures that will thicken and ferment it in the dehydrator.
Step 4: Fill your jars for the dehydrator
Pour the milk–starter mix into clean jars or containers.
Leave a little space at the top of each jar.
Put the lids on loosely.
Arrange the jars on the shelves of your dehydrator – use a single tray for larger jars or spread smaller jars across multiple trays. With the removable, flexible trays, you can set it up in whatever way works best for you and your family.
This is where your dehydrator becomes a yogurt incubator.
Set your dehydrator to 40–45°C / 104–113°F
Place your jars into the unit
Close the door and leave the yogurt to incubate for 6–12 hours
As a guide:
6–8 hours → milder flavor, softer set
8–12 hours → thicker texture, tangier flavor
Try not to open the dehydrator door too often. Each time you open it, the temperature drops and slows the fermentation process.
One of the big advantages of a 10 tray dehydrator is its even airflow. Air circulates around the jars, helping them maintain a consistent temperature, so the jars on the top shelf set just as nicely as the jars on the bottom shelf.
Step 6: Chill and set the yogurt
After your chosen incubation time:
Gently tilt one jar. If the yogurt moves as a soft, solid mass (not like liquid milk), it’s set.
Move the jars straight into the fridge.
Chill for at least 6–8 hours before eating.
Chilling finishes the setting process and gives the yogurt its final texture.
Tips for thick, creamy dehydrator yogurt
If you want your dehydrator yogurt extra thick and creamy, try these tips:
Use whole milk rather than low-fat.
Incubate closer to the 10–12 hour mark for a firmer set.
Avoid moving or shaking jars during incubation.
For Greek-style yogurt, strain the finished yogurt through a clean cloth or fine strainer to remove some whey.
Flavoring your homemade yogurt
Once the yogurt is chilled and set, you can enjoy it plain or add your favorite mix-ins. Try:
For best results, add flavors after incubation, not before. This keeps the fermentation predictable and consistent.
How to reuse your homemade yogurt as a starter
One of the biggest benefits of making yogurt in your dehydrator is how easily you can keep the cycle going.
From your last batch, simply:
Save 2–3 tablespoons of plain, unsweetened homemade yogurt.
Use it exactly as you would store-bought yogurt starter in your next batch.
Over time, if the yogurt starts to set less firmly or taste off, switch back to a fresh starter with strong live cultures.
FAQ: Yogurt in a dehydrator
Can I make yogurt in any dehydrator? You can make yogurt in many dehydrators that let you set a temperature around 40–45°C / 104–113°F – but not all dehydrators are created equal. Because yogurt is a milk product, you don’t want to risk inconsistent temperatures that can encourage unwanted bacteria.
A BenchFoods 10 Tray Dehydrator is purpose-built for this kind of job:
Precise low-temperature control so your yogurt cultures stay in the ideal incubation range.
Powerful, even airflow across all 10 trays, helping every jar set consistently – not just the ones in the middle.
High-grade, insulated design that keeps temperatures steady where plastic units often fluctuate.
Yes, you might get yogurt to work in a basic dehydrator, but if you want reliable, repeatable batches and larger capacity for family-sized yogurt making, a BenchFoods 10 Tray Dehydrator gives you a clear advantage.
How much yogurt can I make in a BenchFoods 10 Tray Dehydrator? With a BenchFoods 10 Tray Dehydrator, you can comfortably fit multiple jars or containers on each shelf. Depending on your jar size, you can easily make several quarts of yogurt in a single batch – perfect for family breakfasts, lunchboxes, and snacks for the week. The large capacity is one of the biggest advantages over small, single-purpose yogurt makers.
What temperature should I set my BenchFoods dehydrator to for yogurt? For most yogurt cultures, set your BenchFoods dehydrator to around 40–45°C / 104–113°F. This is the ideal range for healthy yogurt bacteria to flourish, turning milk into thick, creamy yogurt. The precise digital control on BenchFoods units helps you hold this temperature steady for hours, which is essential for consistent results.
Can I run the BenchFoods dehydrator overnight to make yogurt? Yes. Making yogurt overnight is one of the easiest ways for anyone to fit homemade yogurt into their routine. Simply set up your jars in the evening, set your BenchFoods dehydrator to 40–45°C / 104–113°F for 6–12 hours, and let it work while you sleep. The robust, insulated cabinet and reliable controls are designed for long, low-temperature runs like this.
Is it hard to clean the BenchFoods dehydrator after making yogurt? No. Your yogurt sits in sealed jars or containers, so there’s very little mess inside the dehydrator itself. Usually, all that’s needed is a quick wipe of the shelves and interior with a clean, damp cloth. Your jars go straight into your fridge. This makes using your BenchFoods 10 Tray Dehydrator for yogurt low-effort and easy to maintain, even in a busy household.
How long does homemade yogurt last in the fridge? Generally, homemade yogurt keeps for about 7–10 days in the fridge when stored in clean, sealed containers.
Do I need special jars for dehydrator yogurt? No special jars are required. Any food-safe, heat-safe jars or containers with lids will work, as long as they fit comfortably inside your dehydrator.
By using your 10 tray dehydrator as a yogurt incubator, you can make big, reliable batches of homemade yogurt with very little effort – and for a fraction of the cost of store-bought.
Kate spends her days doing life as a mother of two young boys, tending to chickens, and ducks, working on her organic vegi garden and developing organic recipes that she shares with her friends via Instagram.
Researching and documenting come naturally to Kate, as she has a flare for design and photography.


%20(2).jpg)


.svg)


